Utility program needed to apply the OS/2 fixpaks. Available for different countries (Brazil - Portuguese, Canada - French language, Danish, Dutch - Netherlands, English - United Kingdom, English - United States, Finland, France, Germany, Italy, Japanese, Norway, Portugal, Spain).
Follow us!
Help us and contribute to eCSoft/2 site hosting
Corrective Service facility - Sweden
Version:
2-B
Release date:
Thursday, 1 July, 1999
Home:
Categories:
License:
- Freeware
Interface:
- PMShell
- Workplace Shell
- VIO

Manual installation
Following ones are the download links for manual installation:
| Corrective Service facility - Sweden v. 2-B 1.41 (Revision F.141C, 1/7/1999, International Business Machines Corporation (IBM)) | Readme/What's new |
Readme for Corrective Service Facility 2-B
Version 1.41
****************************
NOTE: Change bars (|) included to the left of the text indicate that this
line has changed or been added since the last READ.ME update.
| This readme file describes the features available with Version 1.41 of the
Corrective Service Facility (referred to in this document as the FixTool).
Once you use this version of the FixTool to service a product, you will not
be able to use Version 1.37B or earlier. SYSLEVEL files are modified by
FixTool 1.38 and later, causing FixTool 1.37B or earlier not to find products
to service.
This document supplements the information given in the README.INF that
comes with the FixTool. The README.INF includes more details about the
FixTool process.
CONTENTS:
Section 1. How to Use the FixTool EXE (Zip) File
Section 2. Files Included in the FixTool EXE File
Section 3. How to Tell What FixTool Version You Have
Section 4. Basic Installation for First-Time FixPak Users
Section 5. Other Ways to Apply Service
Section 6. How to Set Up the FixTool for Remote Installation
Section 7. How to Customize the Response File
Section 8. How to Turn Off Archiving for a FixPak
Section 9. Setting Environment Variables
Section 10. If You Have a Problem
Section 11. Common Error Messages
Section 12. Other Known Problems
Section 13. List of Changes Made for Each Version (1.38 and Later)
******************************************************************************
Section 1. How to Use the FixTool EXE (Zip) File
First, unzip the FixTool zip file onto a diskette or into a directory. You
can do this by copying the self-extracting zip file into a new subdirectory
and then use the following commands from an OS/2 command prompt:
<d>:
cd <directory>
| CSx141 <target>
where <d> is the drive that you've put the FixTool zip file on,
<directory> is the directory that you've copied the self-extracting
zip file to.
x Country code, where '_' is the US country code. Other NLV
country codes are identical to the Country code used in
FixPak's.
<target> is the fully qualified path where the file is to be
unzipped to.
If <target> is not a diskette, you can also copy all the files in <target>
| onto a diskette, except for CSx141.EXE if you wish.
Next, you need OS/2 boot capability. For this, you can use any of the
following:
- boot the install diskettes for the product you're servicing
- create utility diskettes from your system and boot these
- use a maintenance partition if you have one
- boot through Alt-F1 and go to the command prompt
- boot OS/2 as usual and then open an OS/2 session
******************************************************************************
Section 2. Files Included in the FixTool EXE File
The following files are included in the FixTool EXE (Zip) file:
File Use
-------------- -----------------------------------------------------------
BUILD.LVL Contains build information for this FixTool release.
CSFPANS.DLL Used by FSERVICE
| SERVICE.EXE Executable for applying service through a windowed session
SERVICE.HLP SERVICE help file
SHPIINST.DLL FixTool required DLL
UNPACK.EXE Used to unpack files being serviced
UNPACK2.EXE Used to unpack files being serviced
VIOCALLS.DLL FixTool required DLL
| FSERVICE.EXE Executable for applying service through a command line
(used with a response file).
IBMCSFLK.DLL Locked file device driver file
IBMCSFLK.EXE Locked file device driver file
IBMCSFLK.SYS Locked file device driver file
IBMCSFLK.MSG Locked file device driver file
PACK.EXE Used to pack files being archived or backed up
README.INF General Installation instructions for the FixTool
RESPONSE.LAN Response file for servicing network-related products
| RESPONSE.WP3 Response file for servicing OS/2 Warp v3 base
| RESPONSE.WP4 Response file for servicing OS/2 Warp v4 base
FSERVICE.MSG FSERVICE message file
FPINST.CMD Command file for applying service through FSERVICE
(uses standard response files for OS/2 Warp 3, OS/2 Warp 4,
and network-related FixPaks)
NLS.DLL FixTool required DLL
MSG.DLL FixTool required DLL
| FILEFIX.DLL FixTool required DLL
ARCHCTL.CMD Command file that allows you to turn off archiving for
a particular FixPak.
| READ.ME This file
******************************************************************************
Section 3. How to Tell What FixTool Version You Have
| You can tell if you have Version 1.41 by running BLDLEVEL on SERVICE.EXE or
FSERVICE.EXE. You will see one of the following, depending on which version
of BLDLEVEL.EXE you have.
| Signature: @#IBM:F.141#@ OS/2 Corrective Service Facility (C) IBM 1994
Vendor: IBM
| Revision: 0.141
| File Version: 0.141
Description: OS/2 Corrective Service Facility (C) IBM 1994
| Signature: @#IBM:F.141#@ OS/2 Corrective Service Facility (C) IBM 1994
Vendor: IBM
| Revision: F.141
Description: OS/2 Corrective Service Facility (C) IBM 1994
The new version of the FixTool (Corrective Service Facility) updates the
current CSD field in the SYSLEVEL files of the products it services. After
| applying a FixPak with Version 1.41, you will be able to run SYSLEVEL and
tell what FixPaks you have applied by looking at the current field of the
product's SYSLEVEL file.
This version is also compatible with Software Choice features. If you need to
use Software Choice to install new features for a product, the FixTool will
integrate SYSLEVEL and archive information from the Software Choice install
the next time it services that product.
******************************************************************************
|Section 4. Basic Installation for First-Time FixPak Users
|
| This is a very basic set of instructions to help you install an OS/2 Warp
| FixPak; it contains installation tips from OS/2 support technicians.
|
| This document is designed to help you understand how to prepare your system
| and then install an OS/2 Warp base FixPak. It is important that you also read
| the README file supplied with the FixPak you are installing.
|
| This document only discusses local FixPak installations from diskettes using
| the Corrective Service Facility (CSF) FixTool 1.41. For other methods of
| installation see Section 5.
|
| Before you can begin the FixPak installation, either obtain the FixPak
| diskettes from IBM, or download the FixPak and run LOADDSKF.EXE to convert
| the downloaded FixPak images into a usable diskette format.
|
| Note: LOADDSKF.EXE can be found on the OS/2 Warp installation CD in the
| DISKIMGS directory.
|
|4.1. Prerequisites:
|
|4.1.1. You must have at least 70 megabytes of free space available on your
| hard drive. At least 20 MB of the 70 MB must be available on the C:
| drive if installing to another partition.
|
| To determine how much free space is available, open an OS/2 Command
| Prompt window and type CHKDSK; then press Enter. CHKDSK will search
| the disk and report its findings, including the number of kilobytes
| available for use. This number must exceed 70000 kilobytes.
|
|4.2.2. You must create utility diskettes.
|
| These diskettes will allow you to boot to a command prompt and perform
| various utility maintenance jobs on your computer to prepare it for the
| FixPak install as well as to help recover from some minor problems.
|
| 4.2.2.1. How to create utility diskettes:
|
| Note: Before you begin, you must have three blank diskettes and the
| installation CD for OS/2 Warp 3 or Warp Server, or four blank diskettes
| and the installation CD for OS/2 Warp 4.
|
| a. From the desktop, click on the OS/2 System icon,
| b. Click on the System Setup icon,
| c. Click on the Create Utility Diskettes icon.
| d. Follow the prompts to label, insert and remove the diskettes.
|
|4.2.3. Run CHKDSK.
|
| The computer must be running well before you install a FixPak. If you
| are experiencing any problems with your machine, please contact your
| technical support representative to get the machine fixed. Even if your
| machine is running well, it is a good idea to run CHKDSK; it may find
| and fix some unknown problems.
|
| 4.2.3.1 To run CHKDSK:
|
| a. Shut down the computer.
| b. Insert Utility Diskette 1 in drive A: and restart the computer.
| c. Replace the diskettes as prompted, until you reach an A:\ prompt.
| d. Insert the last utility diskette (Utility Diskette 3 for OS/2 Warp 3,
| Utility Diskette 4 for OS/2 Warp 4).
| e. At the A:\ prompt, type CHKDSK C: /F, then press Enter.
| CHKDSK will search the disk and attempt to fix any problems.
| f. If CHKDSK reports any problems, record the errors, then rerun CHKDSK
| to verify that the problems were actually fixed.
|
|4.2.4. DO NOT USE YOUR SYSTEM
|
| Once you begin a FixPak installation, do not try to use your system for
| any other purpose. Unexpected problems may arise, causing the FixPak
| installation to fail.
|
|4.2.5. Record Your Current Revision Level Number.
|
| Before beginning the FixPak installation, verify the current version and
| revision level of the operating system, as follows:
|
| Open an OS/2 Command Prompt window, and type VER /R, then press Enter.
| Record the information displayed; for example:
|
| The Operating System/2 Version is 4.00
| Revision 9.030
|
| Once you have completed the FixPak installation, you can verify that the
| revision number has been properly updated.
|
|
|4.2.6. UNDERSTAND ALL THE WORDS
|
| If there are any words, phases or instructions in this document that you
| do not understand or if you do not know their meaning, please contact
| your local support representative for an explanation.
|
| Once you have successfully completed all of the above steps, and are
| satisfied that your system is in good working order and ready to begin,
| proceed to the instructions below. If you have any questions or
| concerns, contact you computer support adminstrator and address them
| before continuing.
|
|4.2. Basic Installation Instructions
|
| There are several ways to install a FixPak; this section of the readme
| uses the FPINST procedure.
|
| 1. Shutdown your computer.
|
| 2. Insert Utility Diskette 1 in the diskette drive and restart the
| computer, either by turning on the power, or pressing the
| Ctrl+Alt+Del keys.
|
| 3. As prompted, remove and insert utility diskettes until you come to an
| A:\ prompt.
|
| 4. Remove the current utility diskette, and insert the last of the
| series (Utility Diskette 3 for OS/2 Warp 3, or Utility Diskette 4
| for OS/2 Warp 4).
|
| 5. Type CHKDSK C: /F then press Enter. This will run the CHKDSK program.
| Review the reported findings. Look for any recognizable problems and
| fix them.
|
| Note: If CHKDSK does detect problems, run the command again, to
| verify that the problems were really fixed. If CHKDSK continues to
| find problems and is unable to fix them, please contact your local
| support representative to resolve the problems before continuing
| with the FixPak installation.
|
| 6. As mentioned in Section 2.1 above, CHKDSK also reports the amount of
| free space remaining. If you have at least 70 MB free (70000
| Kilobytes or 70000000 Bytes) then you can proceed with the FixPak
| install. If not, you must delete or move enough files to meet the
| free space requirement before continuing.
|
| 7. Insert the Corrective Service FixTool diskette (CSF FIXT 141).
|
| 8. At the command prompt, enter one of the following commands and then
| press Enter.
|
| For an OS/2 Warp 3 or Warp Server Base FixPak:
| FPINST Warp3
|
| For an OS/2 Warp 4 Base FixPak:
| FPINST Warp4
|
| 9. The FixPak installation program will perform a variety of functions.
|
| Note: Near the beginning of the FixPak installation, it may appear
| as if nothing is happening. Please be patient.
|
| The only other user action required will be to remove and insert
| diskettes as prompted.
|
| When the installation is complete, you will be informed and prompted
| to restart the computer. Do this by pressing Ctrl+Alt+Del, or by
| turning the power off and then back on.
******************************************************************************
Section 5. Other Ways to Apply Service
Once you have boot capability (see Section 1) and are at a command prompt,
you can apply service using one of the following methods:
Using FPINST
Using SERVICE
Using FSERVICE with a custom RESPONSE.FIL
Insert the FixTool diskette you created, or change to the directory that
the FixTool is in, and then use FPINST or FSERVICE as described in
Sections 5.1 and 5.3. To use SERVICE as described in Section 5.2, you
must have OS/2 running without having booted from diskettes, maintenance
partition, or via Alt-F1.
5.1. Using FPINST
To use FPINST, change to the diskette or directory where you have
FPINST.CMD and the related files, and type
FPINST fixpak_type <boot_drive>
where fixpak_type is WARP3 for OS/2 Warp Version 3.0 FixPak installs,
WARP4 for OS/2 Warp Version 4.0 FixPak installs, or
NETWORK for LAN or network-related FixPak installs, and
<boot_drive> is an optional parameter that is only valid when
fixpak_type is NETWORK. This is the boot drive of the
system. This restricts the application of FixPaks to
specific drives on systems where more than one OS/2
system is applied.
| FPINST uses FSERVICE with default response files. These default response
| files do the following:
|
| For OS/2 Base FixPaks, the default response file saves an archive copy of the
| files it services in <boot_drive>:\ARCHIVE. It does not keep a backup for
| files serviced, other than the archived files. If this is not the first OS/2
| base FixPak installed and if you want to be able to backout to the previous
| FixPak level, you must modify the default response file.
|
| Also, the default response file does not automatically replace all files from
| the FixPak. The FixTool will prompt you to find out whether to replace any
| files on the system that appear to be newer than the files in the FixPak.
| This happens because the REPLACE_NEWER flag is not set in the default
| response file for OS/2 Warp v3 or v4.
|
| For LAN or network-related FixPaks, there will be no archives or backups
| kept by default, and the FixTool will service all partitions that contain
| the product being serviced by that FixPak. If you wish to restrict the
| drives serviced, you must modify the default response file.
|
| NOTE: If you need to install a FixPak with different options from the ones
| described above, then you must either modify the default response file or
| use SERVICE instead of FPINST. See Section 6 for information about how to
| modify a response file. See the next section for information about SERVICE.
5.2. Using SERVICE
To use SERVICE, go to the diskette or directory where you have SERVICE.EXE
and the related files. Then type
SERVICE
The program will prompt you for required inputs. See README.INF for more
information about these panels.
With FixTool Version 1.39 or later, the CSFUTILPATH defaults to the path that
you have executed SERVICE from, so you do not need to set this environment
variable if all the FixTool files are in the same directory with SERVICE.EXE.
NOTE: To use SERVICE, you must have the OS/2 PM Shell running. You cannot
run SERVICE if you have booted from install diskettes or if you
pressed Alt-F1 to get to a command prompt.
5.3. Using FSERVICE
To use FSERVICE from a diskette, copy your customized RESPONSE.FIL to the
diskette with the FixTool files, then go to the diskette and type
FSERVICE /R:RESPONSE.FIL
If you have copied the FixTool files into a directory, you need to use the
following command from the directory with FSERVICE.EXE and the related files
(including your custom RESPONSE.FIL):
FSERVICE /R:RESPONSE.FIL /S:<d>:\<directory>
where <d> is the drive with the FixTool related files and
<directory> is the directory structure where you put the FixTool files.
There are optional parameters that can be included on the FSERVICE command
line. See the README.INF file for more details about these parameters.
You should use the /B:<drive> parameter with FSERVICE when applying LAN
FixPaks on systems with more than one OS/2 boot partition. <drive> is the
OS/2 boot partition to be serviced.
******************************************************************************
Section 6. How to Set Up the FixTool for Remote Installation
To speed up FixPak installation or to setup a FixPak on a LAN drive
for use by others (Redirected Install), follow these steps.
Before you begin, it is recommended that you install a Virtual Floppy Disk
program such as SVDISK (Super Virtual Disk) or VFDISK (Virtual Floppy Disk).
In the following examples, d: is the working drive and j: is the Virtual
Floppy drive. Replace this with the drive letters you use. Also in these
examples, XR_W035 is the FixPak name.
First, setup a directory to hold the FixTool code. For example,
run the following to place the FixTool into the d:\csf directory.
| cs_141.exe d:\csf
Next, setup the FixPak directory using the diskette images.
loaddskf xr_w035.1dk j: /f/y/q
xcopy j: d:\xr_w035\ /h/o/t/s/e/r/v
loaddskf xr_w035.2dk j: /f/y/q
xcopy j: d:\xr_w035\ /h/o/t/s/e/r/v
...
...
... <repeat for each disk image in the FixPak>
Install the FixPak by running service.exe.
set csfutilpath=d:\csf
set csfcdromdir=d:\xr_w035
d:
cd csf
service (or start service)
You can also apply service by running fservice.exe with a response file.
d:
cd csf
fservice /r:d:\csf\response.wp3 /s:d:\xr_w035
This will apply the FixPak to all serviceable partitions. If you want
to make the response file specific to a partition (drive) then you need
to change the :SYSLEVEL and :ARCHIVE lines in response.wp3:
:SYSLEVEL \OS2\INSTALL\SYSLEVEL.OS2
:ARCHIVE \ARCHIVE
-- should be changed to --
:SYSLEVEL x:\OS2\INSTALL\SYSLEVEL.OS2
:ARCHIVE x:\ARCHIVE
where x: is the drive you want serviced.
******************************************************************************
Section 7. How to Customize the Response File
There are three standard response files included with the FixTool that can be
modified for your configuration needs. To modify a response file, copy one
of the standard response files (RESPONSE.WP3, RESPONSE.WP4, or RESPONSE.LAN)
to a file called RESPONSE.FIL. Modify the RESPONSE.FIL as needed, and then
run FSERVICE /R:RESPONSE.FIL.
The following sections show a few of the service actions you can take through
a response file. For more information about response files, view the
README.INF file that comes with the FixTool.
7.1. Applying Service to a Product Without an Existing Archive
This response file can be used to apply service for the first time using
FSERVICE when there is no existing archive of the product being serviced. It
will service all partitions and place an archive in each partition. It does
not take a backup of changed files.
In this case, the SERVICE.LOG file will go into the C:\OS2\INSTALL directory.
Files that are read-only, hidden, or system files will be replaced
automatically during service. The FixPak source files are on A:. The FixTool
will service all partitions where \OS2\INSTALL\SYSLEVEL.OS2 and
\MMOS2\INSTALL\SYSLEVEL.MPM are found, and it will save the original files in
an \ARCHIVE directory for each partition serviced.
Note that the :LOGFILE tag is optional and may be overridden by using the /L:
parameter on the FSERVICE command line. The :FLAGS and :SOURCE tags are also
optional, but if used, the :SERVICE tag must be included. The :SOURCE tag
can be overridden by using the /S: parameter on the FSERVICE command line.
You should include a :SERVICE, :SYSLEVEL, and :ARCHIVE tag for each product
to be serviced. Note that the :SERVICE, :SYSLEVEL, and :ARCHIVE tags must
appear in the order shown in this example.
| The REPLACE_NEWER flag can be added to the :FLAGS line as shown here:
| :FLAGS REPLACE_PROTECTED REPLACE_NEWER
|
| This flag will replace files automatically instead of giving a pop-up
| panel that questions whether you want to replace a file that is newer on
| the system with an older version from the FixPak.
|
| Warning: Using the REPLACE_NEWER flag may cause files to be back-leveled.
| Be sure that you know it is okay to replace the files that are newer before
| you use this flag.
|
| This flag was included in the previous default response files for OS/2 Warp 3,
| but has been deleted because it allows you to back-level files
| unintentionally.
:LOGFILE C:\OS2\INSTALL\SERVICE.LOG
:FLAGS REPLACE_PROTECTED
:SOURCE A:\
:SERVICE
:SYSLEVEL \OS2\INSTALL\SYSLEVEL.OS2
:ARCHIVE \ARCHIVE
:SERVICE
:SYSLEVEL \MMOS2\INSTALL\SYSLEVEL.MPM
:ARCHIVE \ARCHIVEM
For OS/2 Warp 4 systems, the multimedia lines are not needed in the response
file. So, the last three lines in the previous example should be removed or
commented out of the response file for OS/2 Warp 4.0.
7.2. Applying Service to a Product With an Existing Archive
This response file can be used to apply service using FSERVICE when there is
an existing archive of the product being serviced. This demonstrates the
ability to take a backup of changed files.
Notice that each product serviced must be backed up to a different directory,
so the drive must be explicitly defined in the :SYSLEVEL, :ARCHIVE, and
:BACKUP lines. Also note the order of the :SERVICE, :SYSLEVEL, :ARCHIVE,
and :BACKUP tags. These tags must appear in this order. The :BACKUP tag is
optional.
| The REPLACE_NEWER flag can be added to the :FLAGS line as shown here:
| :FLAGS REPLACE_PROTECTED REPLACE_NEWER
|
| This flag will replace files automatically instead of giving a pop-up
| panel that questions whether you want to replace a file that is newer on
| the system with an older version from the FixPak.
|
| Warning: Using the REPLACE_NEWER flag may cause files to be back-leveled.
| Be sure that you know it is okay to replace the files that are newer before
| you use this flag.
|
| This flag was included in the previous default response files for OS/2 Warp 3,
| but has been deleted because it allows you to back-level files
| unintentionally.
:LOGFILE C:\OS2\INSTALL\SERVICE.LOG
:FLAGS REPLACE_PROTECTED
:SOURCE A:\
:SERVICE
:SYSLEVEL C:\OS2\INSTALL\SYSLEVEL.OS2
:ARCHIVE C:\ARCHIVE
:BACKUP C:\BACKUP
:SERVICE
:SYSLEVEL C:\MMOS2\INSTALL\SYSLEVEL.MPM
:ARCHIVE C:\ARCHIVEM
:BACKUP C:\BACKUPM
For OS/2 Warp 4.0, the last four lines are not needed in the response file.
7.3. Backing Out to the Archive Level of a Product
This is a sample response file to be used when backing out to the archive
level of a product. Note that you can only use one :TARGET tag in the
response file. Also note that the :TARGET tag must appear before a :BACKOUT
tag is used.
:LOGFILE C:\OS2\INSTALL\SERVICE.LOG
| :SOURCE A:\
:TARGET ARCHIVE
:BACKOUT
:SYSLEVEL C:\OS2\INSTALL\SYSLEVEL.OS2
:BACKOUT
:SYSLEVEL C:\MMOS2\INSTALL\SYSLEVEL.MPM
For OS/2 Warp 4.0, you do not need to include the last two lines of this
example in your response file.
7.4. Backing Out to the Backup Level of a Product
This is a sample response file to be used when backing out to the backup
level of a product.
:LOGFILE C:\OS2\INSTALL\SERVICE.LOG
| :SOURCE A:\
:TARGET BACKUP
:BACKOUT
:SYSLEVEL C:\OS2\INSTALL\SYSLEVEL.OS2
:BACKOUT
:SYSLEVEL C:\MMOS2\INSTALL\SYSLEVEL.MPM
For OS/2 Warp 4.0, you do not need to include the last two lines of this
example in your response file.
7.5. Committing a Product
This is a sample response file to be used when committing a product.
:LOGFILE C:\OS2\INSTALL\SERVICE.LOG
| :SOURCE A:\
:COMMIT
:SYSLEVEL C:\OS2\INSTALL\SYSLEVEL.OS2
:COMMIT
:SYSLEVEL C:\MMOS2\INSTALL\SYSLEVEL.MPM
For OS/2 Warp 4.0, do not include the last two lines of this example in your
response file.
7.6. Redirecting an Archive of a Product to Another Existing Archive
This is a sample response file to be used when redirecting an archive of a
product to another existing archive location. One example of this would be
for using a shared network archive. Note that the archive directory
specifies the location of an existing archive to which the current product is
being redirected. In this example the arbitrary drive shows S:, which may be
a LAN drive.
:LOGFILE C:\OS2\INSTALL\SERVICE.LOG
| :SOURCE A:\
:REDIRECT
:SYSLEVEL C:\OS2\INSTALL\SYSLEVEL.OS2
:ARCHIVE S:\ARCHIVE
:REDIRECT
:SYSLEVEL C:\MMOS2\INSTALL\SYSLEVEL.MPM
:ARCHIVE S:\ARCHIVEM
For OS/2 Warp 4.0, do not include the last three lines of this example in
your response file.
******************************************************************************
Section 8. How to Turn Off Archiving for a FixPak
With FixTool 1.40 and later, a new utility called ARCHCTL.CMD is included.
This utility allows you to turn off the archiving feature of a FixPak. This
is especially useful if you have already tested a FixPak in a controlled
environment and are convinced that there will be no need to backout the
FixPak to an original product level.
With archiving turned off, you may include a backup directory and backup
to your previous level if desired. But you will not be able to back up
more than one level. For example, if you install OS/2 Base FixPak 8 with
archiving turned off and include a backup directory, then when you install
FixPak 9, the backup directory for FixPak 8 is deleted.
If you do not include a backup directory with archiving turned off, there
is no way to back up to a previous level.
The syntax for the ARCHCTL utility is as follows:
ARCHCTL ON|OFF fixpak_source
where
ON|OFF indicates the action to perform. ON enables archiving;
OFF disables it.
fixpak_source is normally the drive with the first FixPak diskette,
but it can also be the root of the FixPak when copied
to the hard disk (where the \FIX subdirectory is located).
The default for OS/2 FixPaks is ON. The default for LAN FixPaks is OFF.
Examples for turning archiving OFF:
Example 1.
1. Place first FixPak diskette in A:
2. Enter ARCHCTL OFF A:
Example 2.
1. XCOPY all FixPak diskette data to N:\FIXES\FP32
2. Enter ARCHCTL OFF N:\FIXES\FP32
Examples for turning archiving ON:
Example 3.
1. Place first FixPak diskette in A:
2. Enter ARCHCTL ON A:
Example 4.
1. XCOPY all FixPak diskette data to N:\FIXES\FP32
2. Enter ARCHCTL ON N:\FIXES\FP32
******************************************************************************
Section 9. Setting Environment Variables
There are several SET statements that set environment variables for the
FixTool to use. See the table below for a list of these variables and
a description of what they do.
Environment Variable Usage
------------------------------- -----------------------------------
SET CSFUTILPATH=path Allows you to run SERVICE or
FSERVICE from your hard drive or
from a redirected drive.
SET CSFCDROMDIR=path Allows you to install a FixPak
from a redirected drive or CD-ROM.
All of the FixPak files should be
in this path. This path should NOT
be pointing to a floppy (or virtual
floppy) drive.
SET REMOTE_INSTALL_STATE=0|1 If this variable is set to 0, then
upon termination FixTool returns
control to the calling process.
SET CSFDRIVEAPPLY=d Allows you to restrict service to
products found only on drive d and
on the boot drive.
| SET CSFTIMESTAMP=1 Adds a timestamp to each line of the
| SERVICE.LOG file.
******************************************************************************
Section 10. If You Have a Problem
If the FixPak does not install properly, there are files you can look in
to find out what error occurred. The SERVICE.LOG file is the first place
to look. The FixTool puts it in the x:\OS2\INSTALL directory where x: is
the OS/2 boot drive.
| If the FixTool is unable to complete processing successfully, then the next
| time you use the FixTool, it will try to recover, picking up from where it
| stopped previously. It uses information from C:\FIXSTART to recover. You
| may also notice a directory $CSFTMP$ on a drive that had the largest amount
| of free space available when the FixTool last started. It is safe to delete
| this directory and any files in it any time the FixTool is not running. This
| directory is recreated on the drive with the most free space available
| whenever starting the FixTool. Due to system usage and drive space changes,
| it may not be the same drive each time for this directory.
******************************************************************************
Section 11. Common Error Messages
Here are some common error messages that you may receive when running
SERVICE.
- Error message:
An error occurred while searching for files to update.
The reason may be old or corrupt CSF logfiles, CSF_SEL.000
file, or file system corruption. See README file for more
information.
Explanation #1:
You may get this if you have used the new FixTool (version
1.38 or later) to install a FixPak, and then try to use an
old version of the FixTool (version 1.37B or earlier).
Solution #1:
If you are installing a LAN FixPak, you can delete all the
LOGF0000.xxx and LOGSTART.xxx files on your system, and
reapply the FixPak. If you are installing an OS/2 FixPak,
you will also need to copy your original SYSLEVEL.OS2 file
back into the \OS2\INSTALL directory.
Explanation #2:
You may also get this error if you are trying to service
a system that has many syslevel files (over about 150)
on all drives.
Solution #2:
If your system has a large number of syslevel files, you
may have to limit the search for products to be serviced
by using the following set statement before you run SERVICE:
SET CSFDRIVEAPPLY=d
where d is the drive you wish to service. This statement
limits the search for serviceable products to one drive at
a time in addition to the boot drive. This will get the
number of files opened down to a workable level.
- Error message:
No products were found on the target system to service.
Explanation #1:
Your SYSLEVEL.xxx file does not contain the proper
prerequisite FixPak number or product information. In
order to install a FixPak, the number of the FixPak must
be higher than the number of the current CSD in the
SYSLEVEL.xxx file, or the product information must match.
Solution #1:
Check the prerequisites needed for the FixPak you are
trying to install. Some FixPaks have a particular FixPak
that must be installed prior to installing that FixPak.
Also, make sure that the FixPak you are trying to install
is one that may be applied to that product. If the product
information is incorrect, you may need to copy the product
SYSLEVEL.xxx file from the install media.
Explanation #2:
If you have committed an OS/2 base FixPak with Version 1.38
or Version 1.39, you may get this message when you try to
install another FixPak.
Solution #2:
Copy the product's SYSLEVEL.xxx file from the install media
or from a backup copy that was made prior to committing the
FixPak.
- Error message:
The path <path\filename> does not exist or is invalid.
Explanation:
FixTool could not unpack the file specified in the message,
or it could not unpack the file just prior to the file
specified in the message.
Solution:
This indicates that the FixPak media is bad. You should
download the FixPak again, re-create the FixPak diskettes,
and then re-install the FixPak. The FixTool will resume,
starting at the point where it stopped.
If you get RC=109 in the service.log, the file listed prior
to the first RC=109 is probably giving an unpack error. The
modules that received the 109 error were not updated properly.
Make sure that you are using the UNPACK2.EXE that comes with
this version of the FixTool. You should also download the FixPak
again and re-create the FixPak diskettes. Then reinstall the
FixPak from the new media. The FixTool will resume, updating
any files that were not originally updated. If this does not
fix the problem, please contact your service representative.
- Error message:
Error reading file <path>\IBMCSFLK.DLL.
Explanation:
FixTool could not find the files needed for servicing.
Solution:
Make sure that you've set the CSFUTILPATH and CSFCDROMDIR
environment variables if you're running service from a hard
drive. The CSFUTILPATH should point to the directory that
contains the FixTool files (SERVICE.EXE, FSERVICE.EXE, etc.),
and CSFCDROMDIR should point to the directory that contains
the FixPak files (with the FIX directory). Also make sure
that all the files listed in Section 2 are in your FixTool
file directory.
- Error message:
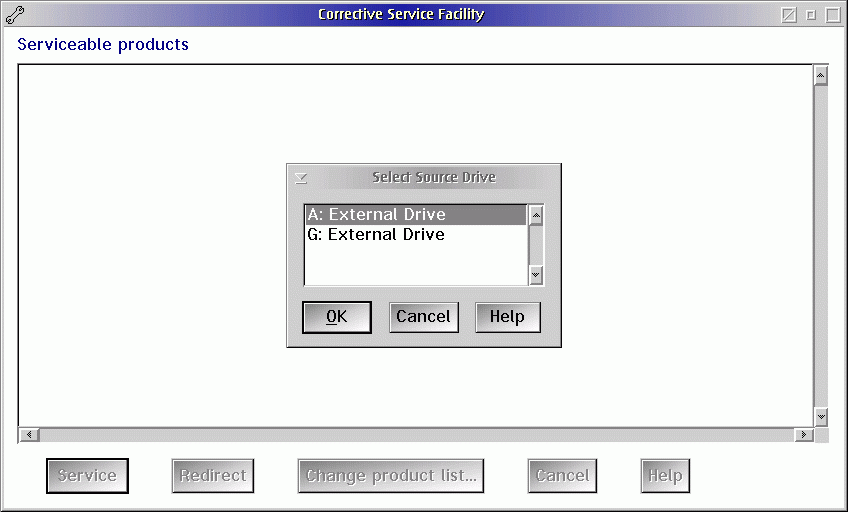
No source drive is available.
Explanation:
The FixTool first checks for removable drives on the system.
If there are no removable drives, you will get this error
message if you have not set the CSFCDROMDIR to point to a valid
hard drive or LAN drive.
Solution:
Set the CSFCDROMDIR to point to the drive and directory that
contain the FixPak files.
- Error message:
Checksum error in <file>.
Explanation:
The FixTool checks the checksum of the source media with a
checksum that was recorded when the FixPak was created. If
these values do not match, you will receive this error.
Solution:
This indicates that the FixPak media is bad. Download the
FixPak again and re-create the FixPak diskettes, or get another
FixPak CD. Then reinstall the FixPak. The FixTool will resume,
starting at the point where it stopped.
- Error message:
The path SET CSFCDROMDIR=<path\filename> does not exist or is
invalid.
Explanation:
FixTool could not find the FIX directory in the path given in
the SET CSFCDROMDIR statement.
Solution:
Check to make sure the path given in the SET CSFCDROMDIR statement
is pointing to the directory that contains the FixPak. This
directory should contain all the files and directories included in
the FixPak.
Here are some common error messages that you might see when running
FSERVICE.
- Error message:
CSF257: No product has been selected.
Explanation:
This error message is reported in several situations. You may
not have selected a product to service in the RESPONSE.FIL, or
FSERVICE may not have found any products to service. If FSERVICE
didn't find any products to service, either the product information
on the system did not match the product information in the FixPak,
or FSERVICE determined that the FixPak would back-level the system.
Solution:
Check the prerequisites for the FixPak and make sure that the
system contains the proper pre-requisites. Also, be sure that
the FixPak you are trying to install is being applied to the
appropriate product. If the product information is incorrect,
you may need to copy the product SYSLEVEL.xxx file from the
install media.
- Error message:
This portion of service has completed. Reboot your
system before applying additional service or using the product
to process files that were locked during service.
Explanation:
This appears as a red screen with a title of "Corrective Service
Facility Fatal Error," but the message may not indicate an error.
Please view the service.log file by pressing Enter. This screen
appears after doing a backout with FSERVICE so that you can check
the log file to make sure there are no errors before you reboot
your system.
Solution:
Make sure that there are no errors logged and then press Ctrl-Break
to exit service. If there were no errors in the log file, then
FSERVICE completed successfully and it's safe to reboot your system.
- Error message:
Error reading file <path>\IBMCSFLK.DLL.
Explanation:
FixTool could not find the files needed for servicing.
Solution:
Make sure that all the files listed in Section 2 are in the
directory (or on the diskette) with the FixTool files. Also,
make sure your /S: parameter path is valid. It should contain the
FixPak files with the FIX directory. Sometimes you may need to
include the /S: parameter--even if you have set SOURCE properly in
the response file.
******************************************************************************
Section 12. Other Known Problems
The following problems have also been encountered:
- When using SERVICE, one of the panels contains a Reboot button that
no longer is needed. This button was used when you wanted to reboot
from the CSF boot diskettes, but the CSF boot diskettes are no longer
available. You should select Continue, or you can select Cancel and
reboot the system using boot diskettes for that product.
- BOOTOS2 induced problem. BOOTOS2 (corrected in latest version)
copied the SYSLEVEL.OS2 file from the booted partition which was used
to create the BOOTOS2 partition to the new partition. This SYSLEVEL.OS2
file could have had default service directories that included drive
letters in it. Since BOOTOS2 copied the file to a different partition,
the wrong drive letter would be specified for the FixTool to use when
looking for files to be serviced. The SYSLEVEL.OS2 normally would have
default directories in it after one had applied service to a partition,
or possibly after the system install. The net result here is that
if you had a SYSLEVEL.OS2 file with default directories in it, then
created a BOOTOS2 partition, and later tried to service the BOOTOS2
partition, the FixTool not only would apply service to the BOOTOS2
partition, but the default directories in the SYSLEVEL.OS2 file as well
(the partition where the SYSLEVEL.OS2 came from).
The solution here is to copy the SYSLEVEL.OS2 from your distribution
diskette or CD into OS2\INSTALL directory of the BOOTOS2 partition before
applying service to that partition.
| - A trap can occur if you include an unformatted drive for the archive
| directory. This occurs even if you format the drive in a different
| session before the FixTool processes any files for archiving. This
| happens because the FixTool scans for formatted drives at the beginning
| of the program and creates a list of possible drives, which is not added
| to during subsequent processing.
| The solution is to make sure that you have a valid, formatted drive
| given for the ARCHIVE directory BEFORE the FixTool starts. If not, you
| must stop and then restart the FixTool once the drive is valid.
| - If your drive C: is formatted with NTFS or FAT32, you may get the following
| error message: "An error occurred. The reason may be old or corrupt CSF
| logfiles, CSF_SEL.000 file, or file system corruption." This is a general
| error message that's returned when an unexpected return code is encountered.
| The error is sent because the FixTool searches for the FIXSTART file on C:,
| and therefore needs a C: partition that contains data it can read, such as
| FAT or HPFS.
| The solution is to create a dummy C: partition that's formatted FAT or HPFS.
| Try to boot to that C: partition (which will fail, but allows it to remain
| the active C: partition). Then boot OS/2 and install the FixPak.
| Finally, boot to the other C: partition, which will make it the default C:
| drive.
******************************************************************************
Section 13. List of Changes Made for Each Version (1.38 and Later)
This section gives a description of what changes have been made
for the new versions of the FixTool (Version 1.38 and later).
| NOTE: FixTool 1.41 and FixTool 1.37B are the only supported FixTools.
| FixTool 1.41 supersedes all FixTools. FixTool 1.37B can
| continue to be used only on FixPaks that it was released with.
| All other FixPaks should use FixTool 1.41.
| Changes Made in Version 1.41
|
| - Added the ability to include a timestamp in the SERVICE.LOG file.
|
| - Enhanced the performance when installing from diskettes.
|
| - Copy packed files to a temporary directory on the hard drive and then
| run checksum and unpack against the files on the temporary directory.
| An additional 1.1 MB is required for this processing. The drive used for
| this is the one with the most available space.
|
| - Fixed error that occurred when C: is the CD-ROM drive. CSF_SEL.000 and
| FIXSTART will be written to the first non-removable, non-network drive
| on the system.
|
| - Changed Backout routine so that any CSBKExxx.EXE exit routines will run
| last, after the syslevel files are updated and the files are backed out.
|
| - Updated FILEFIX.DLL to detect invalid release numbers. These must be
| between 1 and 255. Also, this file was updated to not return a mismatch
| when the file versions are the same.
Changes Made in Version 1.40
- Fixes a commit problem introduced with FixTool 1.38. If you
committed an OS/2 base FixPak with Version 1.38 or 1.39, you
cannot install subsequent FixPaks without reverting to a
SYSLEVEL.OS2 file used prior to the commit (you can use the
SYSLEVEL.OS2 that was shipped with the product from the product
diskettes/CD).
After you had done a commit, applied a FP to the committed base,
and then either restored from the commit Archive or backed out an
installed FP, the fact that the base was at a specific FixPak
level was lost. The FixTool will now create in OS2\INSTALL a file
named FPCOMMIT.OS2 to hold the base committed SYSLEVEL. This will
be restored to SYSLEVEL.OS2 during either of these 2 restore
activities. Do not erase this file.
- Eliminates a SYS0039 error when using SERVICE without a diskette
in the drive when starting the FixTool.
- Allows you to set a new CSFDRIVEAPPLY environment variable prior
to running SERVICE which will limit the search for products to be
serviced to the drive given in the set statement and to the boot
drive.
- Includes an updated FPINST.CMD file that uses the /B: parameter
for LAN-related FixPak installations.
- Includes an updated UNPACK2.EXE and updated error handling for
messages coming from UNPACK2.EXE.
- Includes checksum verification on the source media. This fix
prevents corrupted source files from being transferred to the
target system. You may also notice a slight increase in the
time it takes to process files to be updated.
- Includes an ARCHCTL utility that allows you to turn off archive
processing for a particular FixPak.
Changes Made in Version 1.39
- Works with OS/2 Warp v3.0 and LAN-related FixPaks. The backout-
to-backup process was fixed for LAN-related FixPaks.
- The CSFUTILPATH environment variable does not have to be set to
be able to run SERVICE from a hard drive.
- Now services systems that do not have a removable media drive.
- Contains an updated response file for Warp 4 systems.
Changes Made in Version 1.38
NOTE: Version 1.38 of the FixTool was for use with OS/2 Warp v4.0 systems
only.
- Updates the CSD level in the SYSLEVEL.xxx file for all products.
The CSD level is updated to match the FixPak number.
- Recognizes Software Choice installed features. When backing out
a FixPak, you will be given a chance to cancel the backout if a
Software Choice installed feature will be broken by the FixPak
backout.
- No longer uses CSF boot diskettes. The FixTool now comes as a
self-extracting zip file that can be unzipped to a single diskette.
- Places the locked file device driver statements closer to the
beginning of the CONFIG.SYS.
- Corrects a problem with the backout-to-backup process when a file
is serviced in more than one directory. |
 service.boulder.ibm.com/ps/products/os2/fixtool/sweedish/csw141.exe service.boulder.ibm.com/ps/products/os2/fixtool/sweedish/csw141.exe |
||
| Corrective Service facility - Sweden v. 2-B 1.39 (20/8/1998, International Business Machines Corporation (IBM)) | Readme/What's new |
Readme for Corrective Service Facility 2-B
Version 1.39
****************************
This readme file describes the new features available with Version 1.39 of the
Corrective Service Facility (referred to in this document as the FixTool).
Once you use this version of the FixTool to service a product, you will not
be able to use Version 1.37B or earlier because this version modifies
SYSLEVEL files and versions prior to 1.38 did not.
CONTENTS:
Section 1. New Features with Version 1.39
Section 2. Files Included in the FixTool EXE File
Section 3. How to Use the FixTool EXE (Zip) File
Section 4. How to Apply Service
Section 5. How to Set Up the FixTool for Remote Installation
Section 6. How to Customize the Response File
Section 7. If You Have a Problem
Section 8. Setting Environment Variables
Section 9. Common Error Messages
================================================
Section 1. New Features with Version 1.39
You can tell if you have Version 1.39 by running BLDLEVEL on SERVICE.EXE or
FSERVICE.EXE. You will see one of the following, depending on which version of
BLDLEVEL.EXE you have.
Signature: @#IBM:F.139#@ OS/2 Corrective Service Facility (C) IBM 1994
Vendor: IBM
Revision: 0.139
File Version: 0.139
Description: OS/2 Corrective Service Facility (C) IBM 1994
Signature: @#IBM:F.139#@ OS/2 Corrective Service Facility (C) IBM 1994
Vendor: IBM
Revision: F.139
Description: OS/2 Corrective Service Facility (C) IBM 1994
The new version of the FixTool (Corrective Service Facility) updates the
current CSD field in the SYSLEVEL files of the products it services. After
applying a FixPak with Version 1.38, you will be able to run SYSLEVEL and
tell what FixPaks you have applied by looking at the current field of the
product's SYSLEVEL file.
This version is also compatible with Software Choice features. If you need to
use Software Choice to install new features for a product, the FixTool will
integrate SYSLEVEL and archive information from the Software Choice install the
next time it services that product.
Section 2. Files Included in the FixTool EXE File
The following files are included in the FixTool EXE (Zip) file:
File Use
-------------- -----------------------------------------------------------
BUILD.LVL Contains build information for this Fixtool release.
CSFPANS.DLL Used by FSERVICE
SERVICE.EXE Executable for applying service through a windowed session
SERVICE.HLP SERVICE help file
SHPIINST.DLL FixTool required DLL
UNPACK.EXE Used to unpack files being serviced
UNPACK2.EXE Used to unpack files being serviced
VIOCALLS.DLL FixTool required DLL
FSERVICE.EXE Executable for applying service through a command line
(used with a response file).
IBMCSFLK.DLL Locked file device driver file
IBMCSFLK.EXE Locked file device driver file
IBMCSFLK.SYS Locked file device driver file
IBMCSFLK.MSG Locked file device driver file
PACK.EXE Used to pack files being archived or backed up
README.INF General Installation instructions for the FixTool
RESPONSE.LAN Response file for servicing network-related products
RESPONSE.WP3 Response file for servicing OS/2 Warp v3 base
RESPONSE.WP4 Response file for servicing OS/2 Warp v4 base
FSERVICE.MSG FSERVICE message file
FPINST.CMD Command file for applying service through FSERVICE
(uses standard response files for OS/2 Warp 3, OS/2 Warp 4,
and network-related FixPaks)
NLS.DLL FixTool required DLL
MSG.DLL FixTool required DLL
FILEFIX.DLL FixTool required DLL
READ.ME This file
Section 3. How to Use the FixTool EXE (Zip) File
First, unzip the FixTool zip file onto a diskette or into a directory. You can
do this by copying the self-extracting zip file into a new subdirectory and
then use the following commands from an OS/2 command prompt:
<d>:
cd <directory>
CSx139 <target>
where <d> is the drive that you've put the FixTool zip file on,
<directory> is the directory that you've copied the self-extracting
zip file to.
x Country code, where '_' is the US country code. Other NLV
country codes are identical to the Country code used in
FixPak's.
<target> is the fully qualified path where the file is to be
unzipped to.
If <target> is not a diskette, you can also copy all the files in <target>
onto a diskette, except for CSx139.EXE if you wish.
Next, you need OS/2 boot capability. For this, you can use any of the
following:
- boot the install diskettes for the product you're servicing
- create utility diskettes from your system and boot these
- use a maintenance partition if you have one
- boot through Alt-F1 and go to the command prompt
- boot OS/2 as usual and then open an OS/2 session
Section 4. How to Apply Service
Once you have boot capability (see Section 3) and are at a command prompt,
you can apply service using one of the following methods:
Using FPINST
Using SERVICE
Using FSERVICE with a custom RESPONSE.FIL
Insert the FixTool diskette you created, and then use FPINST or FSERVICE
as described in Sections 4.1 and 4.3. To use SERVICE as described in
Section 4.2, you must have OS/2 running without having booted from
diskettes, maintenance partition, or via Alt-F1.
4.1. Using FPINST
To use FPINST, go to the diskette or directory where you have FPINST.CMD
and the related files, and type
FPINST <fixpak_type>
where <fixpak_type> is
WARP3 for OS/2 Warp Version 3.0 FixPak installs,
WARP4 for OS/2 Warp Version 4.0 FixPak installs, or
NETWORK for LAN or network-related FixPak installs
This uses FSERVICE with a standard response file. For OS/2 Base FixPaks, the
response file saves an archive copy of the files it services in
<boot_drive>:\ARCHIVE. For LAN or network-related FixPaks, there is no archive
or backup created. If you want to keep a backup with network-related FixPaks,
use SERVICE or use FSERVICE with a custom RESPONSE.FIL. See Section 6 for more
information on customizing a response file.
4.2. Using SERVICE
To use SERVICE, go to the diskette or directory where you have SERVICE.EXE and
the related files. Then type
SERVICE
The program will prompt you for required inputs. See README.INF for more
information about these panels.
With version 1.39 of the FixTool, the CSFUTILPATH defaults to the path that you
have executed SERVICE from, so you do not need to set this environment variable
if all the FixTool files are in the same directory with SERVICE.EXE.
NOTE: To use SERVICE, you must have the OS/2 PM Shell running. You cannot
run SERVICE if you have booted from install diskettes or if you pressed
Alt-F1 to get to a command prompt.
4.3. Using FSERVICE
To use FSERVICE from a diskette, copy your customized RESPONSE.FIL to the
diskette with the FixTool files, then go to the diskette and type
FSERVICE /R:RESPONSE.FIL
If you have copied the FixTool files into a directory, you need to use the
following command from the directory with FSERVICE.EXE and the related files
(including your custom RESPONSE.FIL):
FSERVICE /R:RESPONSE.FIL /S:<d>:\<directory>
where <d> is the drive with the FixTool-related files and
<directory> is the directory structure where you put the FixTool files.
There are optional parameters that can be included on the FSERVICE command
line. See the README.INF file for more details about these parameters.
Section 5. How to Set Up the FixTool for Remote Installation
If you want to speed up FixPak installation or setup a FixPak on a LAN drive
for use by others (Redirected Install), follow these steps.
Before you begin, I strongly recommend you go install a Virtual Floppy Disk
program like SVDISK (Super Virtual Disk) or VFDISK (Virtual Floppy Disk). Go
to a Web site and search on "virtual floppy" to locate.
In the following examples, d: is the work drive and j: is the Virtual Floppy
drive. Replace this with whatever drive letters you need to use. xr_w035 is
the FixPak we are working with.
First, setup a directory to hold the Fixtool code. For example,
run CS_139.EXE D:\CSF to place the FixTool into the target directory.
Next, setup the FixPak directory using the diskette images.
loaddskf xr_w035.1dk j: /f/y/q
xcopy j: d:\xr_w035\ /h/o/t/s/e/r/v
loaddskf xr_w035.2dk j: /f/y/q
xcopy j: d:\xr_w035\ /h/o/t/s/e/r/v
... ... ... ...
repeat for each disk image in the FixPak
Install the FixPak by running service.exe.
set csfutilpath=d:\csf
set csfcdromdir=d:\xr_w035
d:
cd csf
service (or start service)
You can also apply service by running fservice.exe with a response file.
d:
cd csf
fservice /r:d:\csf\response.wp3 /s:d:\xr_w035
This will apply the FixPak to all servicable partitions. If you want
to make the response file specific to a partition (drive) then you need
to change the :SYSLEVEL and :ARCHIVE lines in response.wp3:
:SYSLEVEL \OS2\INSTALL\SYSLEVEL.OS2
:ARCHIVE \ARCHIVE
-- to --
:SYSLEVEL x:\OS2\INSTALL\SYSLEVEL.OS2
:ARCHIVE x:\ARCHIVE
where x: is the drive you want serviced.
Section 6. How to Customize the Response File
There are three standard response files included with the FixTool that can be
modified for your configuration needs. To modify a response file, copy one of
the standard response files (RESPONSE.WP3, RESPONSE.WP4, or RESPONSE.LAN) to a
file called RESPONSE.FIL. Modify the RESPONSE.FIL as needed, and then run
FSERVICE /R:RESPONSE.FIL.
The following sections show a few of the service actions you can take through
a response file. For more information about response files, view the README.INF
file that comes with the FixTool.
6.1. Applying Service to a Product Without an Existing Archive
This response file can be used to apply service for the first time using
FSERVICE when there is no existing archive of the product being serviced. It
will service all partitions and place an archive in each partition. It does
not take a backup of changed files.
In this case, the SERVICE.LOG file will go into the C:\OS2\INSTALL directory.
Files that are read-only, hidden, system, or newer will be replaced
automatically during service. The FixPak source files are on A:. The FixTool
will service all partitions where \OS2\INSTALL\SYSLEVEL.OS2 and
\MMOS2\INSTALL\SYSLEVEL.MPM are found, and it will save the original files in
an \ARCHIVE directory for each partition serviced.
Note that the :LOGFILE tag is optional and may be overridden by using the /L:
parameter on the FSERVICE command line. The :FLAGS and :SOURCE tags are also
optional, but if used, the :SERVICE tag must be included. The :SOURCE tag can
be overridden by using the /S: parameter on the FSERVICE command line. You
should include a :SERVICE, :SYSLEVEL, and :ARCHIVE tag for each product to be
serviced. Note that the :SERVICE, :SYSLEVEL, and :ARCHIVE tags must appear in
the order shown in this example.
:LOGFILE C:\OS2\INSTALL\SERVICE.LOG
:FLAGS REPLACE_PROTECTED REPLACE_NEWER
:SOURCE A:\
:SERVICE
:SYSLEVEL \OS2\INSTALL\SYSLEVEL.OS2
:ARCHIVE \ARCHIVE
:SERVICE
:SYSLEVEL \MMOS2\INSTALL\SYSLEVEL.MPM
:ARCHIVE \ARCHIVEM
For OS/2 Warp 4 systems, the multimedia lines are not needed in the response
file. So, the last three lines in the previous example should be removed or
commented out of the response file for OS/2 Warp 4.0.
6.2. Applying Service to a Product With an Existing Archive
This response file can be used to apply service using FSERVICE when there is an
existing archive of the product being serviced. This demonstrates the ability
to take a backup of changed files.
Notice that each product serviced must be backed up to a different directory,
so the drive must be explicitly defined in the :SYSLEVEL, :ARCHIVE, and :BACKUP
lines. Also note the order of the :SERVICE, :SYSLEVEL, :ARCHIVE, and :BACKUP
tags. These tags must appear in this order. The :BACKUP tag is optional.
:LOGFILE C:\OS2\INSTALL\SERVICE.LOG
:FLAGS REPLACE_PROTECTED REPLACE_NEWER
:SOURCE A:\
:SERVICE
:SYSLEVEL C:\OS2\INSTALL\SYSLEVEL.OS2
:ARCHIVE C:\ARCHIVE
:BACKUP C:\BACKUP
:SERVICE
:SYSLEVEL C:\MMOS2\INSTALL\SYSLEVEL.MPM
:ARCHIVE C:\ARCHIVEM
:BACKUP C:\BACKUPM
For OS/2 Warp 4.0, the last four lines are not needed in the response file.
6.3. Backing Out to the Archive Level of a Product
This is a sample response file to be used when backing out to the archive level
of a product. Note that you can only use one :TARGET tag in the response file.
Also note that the :TARGET tag must appear before a :BACKOUT tag is used.
:LOGFILE C:\OS2\INSTALL\SERVICE.LOG
:TARGET ARCHIVE
:BACKOUT
:SYSLEVEL C:\OS2\INSTALL\SYSLEVEL.OS2
:BACKOUT
:SYSLEVEL C:\MMOS2\INSTALL\SYSLEVEL.MPM
For OS/2 Warp 4.0, you do not need to include the last two lines of this
example in your response file.
6.4. Backing Out to the Backup Level of a Product
This is a sample response file to be used when backing out to the backup level
of a product.
:LOGFILE C:\OS2\INSTALL\SERVICE.LOG
:TARGET BACKUP
:BACKOUT
:SYSLEVEL C:\OS2\INSTALL\SYSLEVEL.OS2
:BACKOUT
:SYSLEVEL C:\MMOS2\INSTALL\SYSLEVEL.MPM
For OS/2 Warp 4.0, you do not need to include the last two lines of this
example in your response file.
6.5. Committing a Product
This is a sample response file to be used when committing a product.
:LOGFILE C:\OS2\INSTALL\SERVICE.LOG
:COMMIT
:SYSLEVEL C:\OS2\INSTALL\SYSLEVEL.OS2
:COMMIT
:SYSLEVEL C:\MMOS2\INSTALL\SYSLEVEL.MPM
For OS/2 Warp 4.0, do not include the last two lines of this example in your
response file.
6.6. Redirecting an Archive of a Product to Another Existing Archive
This is a sample response file to be used when redirecting an archive of a
product to another existing archive location. One example of this would be for
using a shared network archive. Note that the archive directory specifies the
location of an existing archive to which the current product is being
redirected. In this example the arbitrary drive shows S:, which may be a LAN
drive.
:LOGFILE C:\OS2\INSTALL\SERVICE.LOG
:REDIRECT
:SYSLEVEL C:\OS2\INSTALL\SYSLEVEL.OS2
:ARCHIVE S:\ARCHIVE
:REDIRECT
:SYSLEVEL C:\MMOS2\INSTALL\SYSLEVEL.MPM
:ARCHIVE S:\ARCHIVEM
For OS/2 Warp 4.0, do not include the last three lines of this example in
your response file.
Section 7. If You Have a Problem
If the FixPak does not install properly, there are files you can look in
to find out what error occurred. The SERVICE.LOG file is the first place
to look. The FixTool puts it in the directory where the SYSLEVEL file
of the product being serviced is located.
Section 8. Setting Environment Variables
There are several SET statements that set environment variables for the
FixTool to use. See the table below for a list of these variables and
a description of what they do.
Environment Variable Usage
------------------------------- -----------------------------------
SET CSFUTILPATH=path Allows you to run SERVICE or
FSERVICE from your hard drive or
from a redirected drive.
SET CSFCDROMDIR=path Allows you to install a FixPak
from a redirected drive or CD-ROM.
SET REMOTE_INSTALL_STATE=0|1 If this variable is set to 0, then
upon termination FixTool returns
control to the calling process.
Section 9. Common Error Messages
Here are some common error messages that you may receive when running
SERVICE.
- Error message:
An error occurred while searching for files to update.
The reason may be old or corrupt CSF logfiles, CSF_SEL.000
file, or file system corruption. See README file for more
information.
Explanation:
You may get this if you have used the new FixTool (version
1.38 or 1.39) to install a FixPak, and then try to use an
old version of the FixTool (version 1.37B or earlier).
Solution:
If you are installing a LAN FixPak, you can delete all the
LOGF0000.xxx and LOGSTART.xxx files on your system, and
reapply the FixPak. If you are installing an OS/2 FixPak,
you will also need to copy your original SYSLEVEL.OS2 file
back into the \OS2\INSTALL directory.
- Error message:
No products were found on the target system to service.
Explanation:
Your SYSLEVEL.xxx file does not contain the proper
prerequisite FixPak number or product information. In
order to install a FixPak, the number of the FixPak must
be higher than the number of the current CSD in the
SYSLEVEL.xxx file, or the product information must match.
Solution:
Check the prerequisites needed for the FixPak you are
trying to install. Some FixPaks have a particular FixPak
that must be installed prior to installing that FixPak.
Also, make sure that the FixPak you are trying to install
is one that may be applied to that product. If the product
information is incorrect, you may need to copy the product
SYSLEVEL.xxx file from the install media.
- Error message:
Error reading file <path>\IBMCSFLK.DLL.
Explanation:
FixTool could not find the files needed for servicing.
Solution:
Make sure that you've set the CSFUTILPATH and CSFCDROMDIR
environment variables if you're running service from a hard
drive. The CSFUTILPATH should point to the directory that
contains the FixTool files (SERVICE.EXE, FSERVICE.EXE, etc.),
and CSFCDROMDIR should point to the directory that contains
the FixPak files (with the FIX directory). Also make sure
that all the files listed in Section 2 are in your FixTool
file directory.
- Error message:
No source drive is available.
Explanation:
The FixTool first checks for removable drives on the system.
If there are no removable drives, you will get this error
message if you have not set the CSFCDROMDIR to point to a valid
hard drive or LAN drive.
Solution:
Set the CSFCDROMDIR to point to the drive and directory that
contain the FixPak files.
Here are some common error messages that you might see when running
FSERVICE.
- Error message:
CSF257: No product has been selected.
Explanation:
This error message is reported in several situations. You may
not have selected a product to service in the RESPONSE.FIL, or
FSERVICE may not have found any products to service. If FSERVICE
didn't find any products to service, either the product information
on the system did not match the product information in the FixPak,
or FSERVICE determined that the FixPak would back-level the system.
Solution:
Check the prerequisites for the FixPak and make sure that the
system contains the proper pre-requisites. Also, be sure that
the FixPak you are trying to install is being applied to the
appropriate product. If the product information is incorrect,
you may need to copy the product SYSLEVEL.xxx file from the
install media.
- Error message:
This portion of service has completed. Reboot your
system before applying additional service or using the product
to process files that were locked during service.
Explanation:
This appears as a red screen with a title of "Corrective Service
Facility Fatal Error," but the message may not indicate an error.
Please view the service.log file by pressing Enter. This screen
appears after doing a backout with FSERVICE so that you can check
the log file to make sure there are no errors before you reboot
your system.
Solution:
Make sure that there are no errors logged and then press Ctrl-Break
to exit service. If there were no errors in the log file, then
FSERVICE completed successfully and it's safe to reboot your system.
- Error message:
Error reading file <path>\IBMCSFLK.DLL.
Explanation:
FixTool could not find the files needed for servicing.
Solution:
Make sure that all the files listed in Section 2 are in the
directory (or on the diskette) with the FixTool files. Also,
make sure your /S: parameter path is valid. It should contain the
FixPak files with the FIX directory. Sometimes you may need to
include the /S: parameter--even if you have set SOURCE properly in
the response file. |
|
service.boulder.ibm.com/ps/products/os2/fixtool/sweedish/csw139.exe |
||
| Corrective Service facility - Sweden v. 2-B 1.38 (Revision F.138B, 29/6/1998, International Business Machines Corporation (IBM)) | Readme/What's new |
Readme for Corrective Service Facility 2-B
Version 1.38
****************************
THIS FIXTOOL IS ONLY TO BE USED FOR WARP 4, FP 7
****************************
This readme file describes the new features available with Version 1.38 of the
Corrective Service Facility (referred to in this document as the FixTool).
Once you use the new version of the FixTool to service a product, you will not
be able to use any previous version of the FixTool because the new version
modifies SYSLEVEL files and prior versions do not.
CONTENTS:
Section 1. New Features with Version 1.38
Section 2. Files Included in the FixTool Zip File
Section 3. How to Use the FixTool Zip File
Section 4. How to Apply Service
Section 5. How to Set Up the FixTool for Remote Installation
Section 6. How to Customize the Response File
Section 7. If You Have a Problem
Section 8. Setting Environment Variables
Section 9. Common Error Messages
Section 10. Known Problems
================================================
Section 1. New Features with Version 1.38
You can tell if you have Version 1.38 by running BLDLEVEL on SERVICE.EXE or
FSERVICE.EXE. You will see one of the following, depending on which version of
BLDLEVEL.EXE you have.
Signature: @#IBM:F.138B#@ OS/2 Corrective Service Facility (C) IBM 1994
Vendor: IBM
Revision: 0.138
File Version: 0.138
Description: OS/2 Corrective Service Facility (C) IBM 1994
Signature: @#IBM:F.138B#@ OS/2 Corrective Service Facility (C) IBM 1994
Vendor: IBM
Revision: F.138B
Description: OS/2 Corrective Service Facility (C) IBM 1994
The new version of the FixTool updates the current CSD field in the SYSLEVEL
files of the products it services. After applying a FixPak with Version 1.38,
you will be able to run SYSLEVEL and tell what FixPaks you have applied by
looking at the current field of the product's SYSLEVEL file.
This version is also compatible with Software Choice features. If you need to
use Software Choice to install new features for a product, the FixTool will
integrate SYSLEVEL and archive information from the Software Choice install the
next time it services that product.
Section 2. Files Included in the FixTool Zip File
The following files are included in the FixTool zip file:
File Use
-------------- -----------------------------------------------------------
BUILD.LVL Contains build information for this Fixtool release.
CSFPANS.DLL Used by FSERVICE
SERVICE.EXE Executable for applying service through a windowed session
SERVICE.HLP SERVICE help file
SHPIINST.DLL FixTool required DLL
UNPACK.EXE Used to unpack files being serviced
UNPACK2.EXE Used to unpack files being serviced
VIOCALLS.DLL FixTool required DLL
FSERVICE.EXE Executable for applying service through a command line
(used with a response file).
IBMCSFLK.PK@ Locked file device driver and associated files
(packed file)
PACK.EXE Used to pack files being archived or backed up
README.INF General Installation instructions for the FixTool
RESPONSE.LAN Response file for servicing network-related products
RESPONSE.WP3 Response file for servicing OS/2 Warp v3 base
RESPONSE.WP4 Response file for servicing OS/2 Warp v4 base
CSF_KICK Identifier for the FixTool diskette
FSERVICE.MSG FSERVICE message file
FPINST.CMD Command file for applying service through FSERVICE
(uses standard response files for OS/2 Warp 3, OS/2 Warp 4,
and network-related FixPaks)
NLS.DLL FixTool required DLL
FILEFIX.DL@ FixTool required DLL (packed file)
READ.ME This file
Section 3. How to Use the FixTool Zip File
First, unzip the FixTool zip file onto a diskette or into a directory. You can
do this by copying the self-extracting zip file into a new subdirectory and
then use the following commands from an OS/2 command prompt:
<d>:
cd <directory>
fixt138 <target>
where <d> is the drive that you've put the FixTool zip file on,
<directory> is the directory that you've copied the self-extracting
zip file to.
<target> is the fully qualified path where the file is to be
unzipped to.
If <target> is not a diskette, you can also copy all the files in <target>
onto a diskette, except for FIXT138.EXE if you wish.
Next, you need OS/2 boot capability. For this, you can use any of the
following:
- boot the install diskettes for the product you're servicing
- create utility diskettes from your system and boot these
- use a maintenance partition if you have one
- boot through Alt-F1 and go to the command prompt
- boot OS/2 as usual and then open an OS/2 session
Section 4. How to Apply Service
Once you have boot capability (see Section 3) and are at a command prompt,
you can apply service using one of the following methods:
Using FPINST
Using SERVICE
Using FSERVICE with a custom RESPONSE.FIL
Insert the FixTool diskette you created, and then use FPINST or FSERVICE
as described in Sections 4.1 and 4.3. To use SERVICE as described in
Section 4.2, you must have OS/2 running without having booted from
diskettes, maintenance partition, or via Alt-F1.
4.1. Using FPINST
To use FPINST, go to the diskette or directory where you have FPINST.CMD
and the related files, and type
FPINST <fixpak_type>
where <fixpak_type> is
WARP3 for OS/2 Warp Version 3.0 FixPak installs,
WARP4 for OS/2 Warp Version 4.0 FixPak installs, or
NETWORK for LAN or network-related FixPak installs
This uses FSERVICE with a standard response file. For OS/2 Base FixPaks, the
response file saves an archive copy of the files it services in <boot
drive>:\ARCHIVE. For LAN or network-related FixPaks, there is no archive or
backup created. If you want to keep a backup with network-related FixPaks, use
SERVICE or use FSERVICE with a custom RESPONSE.FIL. See Section 6 for more
information on customizing a response file.
4.2. Using SERVICE
To use SERVICE, go to the diskette or directory where you have SERVICE.EXE and
the related files. If you have copied the FixTool files to a directory, you
need to use the following command to set the CSFUTILPATH environment variable.
Note that CSFUTILPATH defaults to A: drive, so this step is not needed if you
are using diskettes for the FixTool.
SET CSFUTILPATH=<d>:\<directory>
where <d> is the drive with the FixTool-related files and
<directory> is the directory structure where you put the FixTool files.
Then type
SERVICE
The program will prompt you for required inputs. See README.INF for more
information about these panels.
NOTE: To use SERVICE, you must have the OS/2 PM Shell running. You cannot
run SERVICE if you have booted from install diskettes or if you pressed
Alt-F1 to get to a command prompt.
4.3. Using FSERVICE
To use FSERVICE from a diskette, copy your customized RESPONSE.FIL to the
diskette with the FixTool files, then go to the diskette and type
FSERVICE /R:RESPONSE.FIL
If you have copied the FixTool files into a directory, you need to use the
following command from the directory with FSERVICE.EXE and the related files
(including your custom RESPONSE.FIL):
FSERVICE /R:RESPONSE.FIL /S:<d>:\<directory>
where <d> is the drive with the FixTool-related files and
<directory> is the directory structure where you put the FixTool files.
There are optional parameters that can be included on the FSERVICE command
line. See the README.INF file for more details about these parameters.
Section 5. How to Set Up the FixTool for Remote Installation
If you want to speed up FixPak installation or setup a FixPak on a LAN drive
for use by others (Redirected Install), follow these steps.
Before you begin, I strongly recommend you go install a Virtual Floppy Disk
program like SVDISK (Super Virtual Disk) or VFDISK (Virtual Floppy Disk). Go
to a Web site and search on "virtual floppy" to locate.
In the following examples, d: is the work drive and j: is the Virtual Floppy
drive. Replace this with whatever drive letters you need to use. xr_w035 is
the FixPak we are working with.
First, setup a directory to hold the Fixtool code. For example,
run FIXT138.EXE D:\CSF to place the FixTool into the target directory.
Next, setup the FixPak directory using the diskette images.
loaddskf xr_w035.1dk j: /f/y/q
xcopy j: d:\xr_w035\ /h/o/t/s/e/r/v
loaddskf xr_w035.2dk j: /f/y/q
xcopy j: d:\xr_w035\ /h/o/t/s/e/r/v
... ... ... ...
repeat for each disk image in the FixPak
Install the FixPak by running service.exe.
set csfutilpath=d:\csf
set csfcdromdir=d:\xr_w035
d:
cd csf
service (or start service)
You can also apply service by running fservice.exe with a response file.
d:
cd csf
fservice /r:d:\csf\response.wp3 /s:d:\xr_w035
This will apply the FixPak to all servicable partitions. If you want
to make the response file specific to a partition (drive) then you need
to change the :SYSLEVEL and :ARCHIVE lines in response.wp3:
:SYSLEVEL \OS2\INSTALL\SYSLEVEL.OS2
:ARCHIVE \ARCHIVE
-- to --
:SYSLEVEL x:\OS2\INSTALL\SYSLEVEL.OS2
:ARCHIVE x:\ARCHIVE
where x: is the drive you want serviced.
Section 6. How to Customize the Response File
There are three standard response files included with the FixTool that can be
modified for your configuration needs. To modify a response file, copy one of
the standard response files (RESPONSE.WP3, RESPONSE.WP4, or RESPONSE.LAN) to a
file called RESPONSE.FIL. Modify the RESPONSE.FIL as needed, and then run
FSERVICE /R:RESPONSE.FIL.
The following sections show a few of the service actions you can take through
a response file. For more information about response files, view the README.INF
file that comes with the FixTool.
6.1. Applying Service to a Product Without an Existing Archive
This response file can be used to apply service for the first time using
FSERVICE when there is no existing archive of the product being serviced. It
will service all partitions and place an archive in each partition. It does
not take a backup of changed files.
In this case, the SERVICE.LOG file will go into the C:\OS2\INSTALL directory.
Files that are read-only, hidden, system, or newer will be replaced
automatically during service. The FixPak source files are on A:. The FixTool
will service all partitions where \OS2\INSTALL\SYSLEVEL.OS2 and
\MMOS2\INSTALL\SYSLEVEL.MPM are found, and it will save the original files in
an \ARCHIVE directory for each partition serviced.
Note that the :LOGFILE tag is optional and may be overridden by using the /L:
parameter on the FSERVICE command line. The :FLAGS and :SOURCE tags are also
optional, but if used, the :SERVICE tag must be included. The :SOURCE tag can
be overridden by using the /S: parameter on the FSERVICE command line. You
should include a :SERVICE, :SYSLEVEL, and :ARCHIVE tag for each product to be
serviced. Note that the :SERVICE, :SYSLEVEL, and :ARCHIVE tags must appear in
the order shown in this example.
:LOGFILE C:\OS2\INSTALL\SERVICE.LOG
:FLAGS REPLACE_PROTECTED REPLACE_NEWER
:SOURCE A:\
:SERVICE
:SYSLEVEL \OS2\INSTALL\SYSLEVEL.OS2
:ARCHIVE \ARCHIVE
:SERVICE
:SYSLEVEL \MMOS2\INSTALL\SYSLEVEL.MPM
:ARCHIVE \ARCHIVE
6.2. Applying Service to a Product With an Existing Archive
This response file can be used to apply service using FSERVICE when there is an
existing archive of the product being serviced. This demonstrates the ability
to take a backup of changed files.
Notice that each product serviced must be backed up to a different directory.
Also note the order of the :SERVICE, :SYSLEVEL, :ARCHIVE, and :BACKUP tags.
These tags must appear in this order. The :BACKUP tag is optional.
:LOGFILE C:\OS2\INSTALL\SERVICE.LOG
:FLAGS REPLACE_PROTECTED REPLACE_NEWER
:SOURCE A:\
:SERVICE
:SYSLEVEL C:\OS2\INSTALL\SYSLEVEL.OS2
:ARCHIVE C:\ARCHIVE
:BACKUP C:\BACKUP
:SERVICE
:SYSLEVEL C:\MMOS2\INSTALL\SYSLEVEL.MPM
:ARCHIVE C:\ARCHIVE
:BACKUP C:\BACKUPM
6.3. Backing Out to the Archive Level of a Product
This is a sample response file to be used when backing out to the archive level
of a product. Note that you can only use one :TARGET tag in the response file.
Also note that the :TARGET tag must appear before a :BACKOUT tag is used.
:LOGFILE C:\OS2\INSTALL\SERVICE.LOG
:TARGET ARCHIVE
:BACKOUT
:SYSLEVEL C:\OS2\INSTALL\SYSLEVEL.OS2
:BACKOUT
:SYSLEVEL C:\MMOS2\INSTALL\SYSLEVEL.MPM
6.4. Backing Out to the Backup Level of a Product
This is a sample response file to be used when backing out to the backup level
of a product.
:LOGFILE C:\OS2\INSTALL\SERVICE.LOG
:TARGET BACKUP
:BACKOUT
:SYSLEVEL C:\OS2\INSTALL\SYSLEVEL.OS2
:BACKOUT
:SYSLEVEL C:\MMOS2\INSTALL\SYSLEVEL.MPM
6.5. Committing a Product
This is a sample response file to be used when committing a product.
:LOGFILE C:\OS2\INSTALL\SERVICE.LOG
:COMMIT
:SYSLEVEL C:\OS2\INSTALL\SYSLEVEL.OS2
:COMMIT
:SYSLEVEL C:\MMOS2\INSTALL\SYSLEVEL.MPM
6.6. Redirecting an Archive of a Product to Another Existing Archive
This is a sample response file to be used when redirecting an archive of a
product to another existing archive location. One example of this would be for
using a shared network archive. Note that the archive directory specifies the
location of an existing archive to which the current product is being
redirected. In this example the arbitrary drive shows S:, which may be a LAN
drive.
:LOGFILE C:\OS2\INSTALL\SERVICE.LOG
:REDIRECT
:SYSLEVEL C:\OS2\INSTALL\SYSLEVEL.OS2
:ARCHIVE S:\ARCHIVE
:REDIRECT
:SYSLEVEL C:\MMOS2\INSTALL\SYSLEVEL.MPM
:ARCHIVE S:\ARCHIVEM
Section 7. If You Have a Problem
If the FixPak does not install properly, there are files you can look in
to find out what error occurred. The SERVICE.LOG file is the first place
to look. The FixTool puts it in the directory where the SYSLEVEL file
of the product being serviced is located.
Section 8. Setting Environment Variables
There are several SET statements that set environment variables for the
FixTool to use. See the table below for a list of these variables and
a description of what they do.
Environment Variable Usage
------------------------------- -----------------------------------
SET CSFUTILPATH=path Allows you to run SERVICE or
FSERVICE from your hard drive or
from a redirected drive.
SET CSFCDROMDIR=path Allows you to install a FixPak
from a redirected drive or CD-ROM.
SET REMOTE_INSTALL_STATE=0|1 If this variable is set to 1, then
upon termination FixTool returns
control to the calling process.
Section 9. Common Error Messages
Here are some common error messages that you may receive when running
SERVICE.
- Error message:
An error occurred while searching for files to update.
The reason may be old or corrupt CSF logfiles, CSF_SEL.000
file, or file system corruption. See README file for more
information.
Explanation:
You may get this if you have used the new FixTool to install
a FixPak, and then try to use the old FixTool.
Solution:
If you are installing a LAN FixPak, you can delete all the
LOGF0000.xxx and LOGSTART.xxx files on your system, and
reapply the FixPak. If you are installing an OS/2 FixPak,
you will also need to copy your original SYSLEVEL.OS2 file
back into the \OS2\INSTALL directory.
- Error message:
No products were found on the target system to service.
Explanation:
Your SYSLEVEL.xxx file does not contain the proper
pre-requisite FixPak number or product information. In
order to install a FixPak, the number of the FixPak must
be higher than the number of the current CSD in the
SYSLEVEL.xxx file, or the product information must match.
Solution:
Check the pre-requisites needed for the FixPak you are
trying to install. Some FixPaks have a particular FixPak
that must be installed prior to installing that FixPak.
Also, make sure that the FixPak you are trying to install
is one that may be applied to that product. If the product
information is incorrect, you may need to copy the product
SYSLEVEL.xxx file from the install media.
Here's a common error message that you might see when running FSERVICE.
- Error message:
CSF257: No product has been selected.
Explanation:
This error message is reported in several situations. You may
not have selected a product to service in the RESPONSE.FIL, or
FSERVICE may not have found any products to service. If FSERVICE
didn't find any products to service, either the product information
on the system did not match the product information in the FixPak,
or FSERVICE determined that the FixPak would back-level the system.
Solution:
Check the pre-requisites for the FixPak and make sure that the
system contains the proper pre-requisites. Also, be sure that
the FixPak you are trying to install is being applied to the
appropriate product. If the product information is incorrect,
you may need to copy the product SYSLEVEL.xxx file from the
install media.
Section 10. Known Problems
Problem Description:
On some systems, you may get an unpack error for the file IBMCSFLK.PK@.
If this occurs, you will see the following in your SERVICE.LOG file:
Unpack( source, destination ) failed with rc 5.
Retrying unpack for IBMCSFLK.PK@...
where source is the location of the IBMCSFLK.PK@ file, and destination
is the location for the unpacking.
It will try to unpack the file several times, and then finally report:
Error unpacking the file IBMCSFLK.PK@.
Workaround:
Exit and restart service. The error should be resolved on the second
attempt. |
|
service.boulder.ibm.com/ps/products/os2/fixtool/sweedish/csw138b.exe |
||
| Corrective Service facility - Sweden v. 2-B 1.37 (Revision F.137B, 13/5/1997, International Business Machines Corporation (IBM)) | Readme/What's new |
==============================================================================
Corrective Service Facility disks for installing OS/2 2.11, Warp 3
and Warp 4 FixPaks.
CS?137B.EXE is a self-extracting PKZIP file that contains CSFBOTnn.1DK,
CSFBOTnn.2DK, LOADDSKF.EXE and this file.
The CSFBOTnn.?DK files are in LOADDSKF format, use LOADDSKF.EXE to create two
diskettes.
Note: nn is the two character country code, like FR for French or
GR for German, UK for United Kingdon, etc.
==============================================================================
Installation:
Place a blank, formatted 1.44MB diskette in A: (or B:, whichever
is your 3.5inch floppy drive).
Enter LOADDSKF CSFBOTnn.1DK A: to create the 1st diskette
Place another blank, formatted 1.44MB diskette in the same drive.
Enter LOADDSKF CSFBOTnn.2DK A: to create the 2nd diskette
==============================================================================
NOTE: CSFBOTnn.1DK contains the README.INF file which is in INF format.
To view the readme, place the first kicker disk in A: and enter:
VIEW A:\README.INF |
|
service.boulder.ibm.com/ps/products/os2/fixtool/sweedish/csw137b.exe |
Record updated last time on: 17/03/2020 - 06:24

This work is licensed under a Creative Commons Attribution 4.0 International License.
Contact us! (webform or ecsoft2 [dot] org![]() gmail [dot] com (email))
gmail [dot] com (email))
Add new comment